- Home
- Writing Worksheets For Kids
- History Timeline Template
Printable History Timeline Template
Type In Your Own Historical Timeline Dates
This very week you can put together a history timeline template that will help your kids keep track of names, dates, and places - at a glance. And for years.
Simply download the timeline below, type the dates you want, and print on card stock. It will last for years.
Then add new dates, tags, and images by hand.
Oh! How I wish that I had had a timeline like this to keep history in order when I was in school. Like me, how many of us had an A average in history, yet graduated from college with no "sense of history".
The problem is that some history books teach history in scrambled order at least from year to year. This timeline makes a great short cut and study aid for both homeschool history and history class at school.
Now you can print full history timelines for each child and they can keep the same chart through high school and college to add new dates and events as they study.
It actually becomes a keepsake.
For your convenience I'll link to the downloadable timeline PDF several times on this page as I explain some things that have helped us. There's only one timeline on this page. So far. :-)
If you combine geography with history, both will make better sense, especially since geography changes through time.
The countries morph through the years. Cities change names. New territories are explored.
Interactive Timeline Template For Teachers And Advanced Students
This printable timeline is interactive so you or your students can save it to the computer to edit over time. It's great for teachers, parents, grandparents, and tutors.
Once you save the download, you can add text in your favorite colors, SIZES, and fonts to add your own names and dates.
This means that you can save the changes your files before printing and re-save it to your children or students' files thereby saving ink and paper.
- The best place to begin studying history and geography is with a timeline to keep the dates in order and to make associations between historical figures and their places in history.
- The best time to begin using a timeline is at the beginning of the school year.
- You can add to it through the years, too. I was so excited to learn how to do this and this has been a huge help in our family! Our daughters figured how to make this chart and we are sharing it with you.
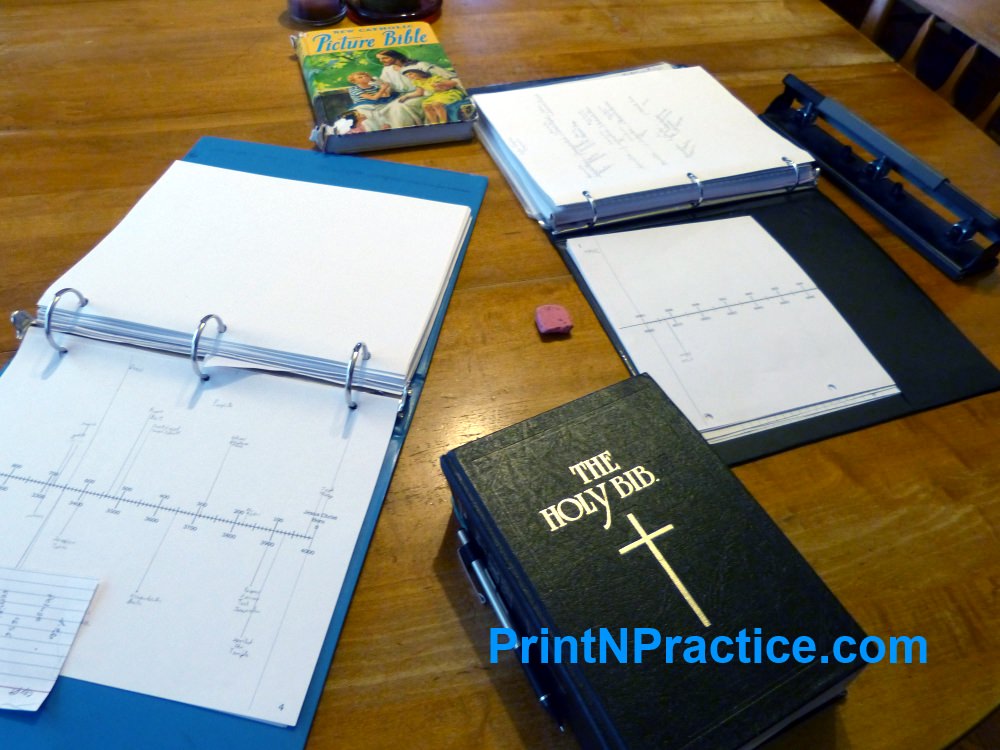
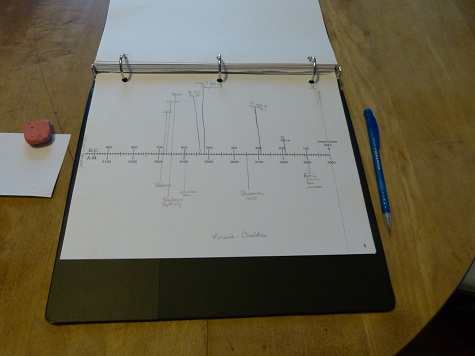
- We print our timelines single sided on card stock or sturdy paper; and keep them in our binders through the middle school and high school years, 5th through 12th grade.
- Another useful time to use a timeline is before tests or finals. Put all the important events in order of time.
- Reviewing names and dates is super easy when they're all laid out in one chart which simplifies taking notes about important events.
If you or your children keep your timeline in the computer, whenever you find a new historical person or event that you would like to track, you can add it to your timeline using your keyboard. You can add dates by hand after it's printed.
See all our PrintNPractice printables in affordable bundles here .
Be encouraged to stay in touch! Join my free newsletter....
Join To Receive My Free PrintNPractice Newsletters!
Free Online Worksheets For School, Homework, And Homeschool Practice
Free Online Teacher Resources - Free Homeschool Curriculum
For teachers and parents: PrintNPractice free printable worksheets are all copyright-free, digital activities for students. Use them in homeschool, interactive notebooks for online classrooms, Google classroom, distance learning, tutoring and learning pods, and hybrid school.
- No prep.
- No tracking.
- Self learning.
- Copyright free.
- Lifetime license.
- Diverse learners.
- Easy drill-and-kill.
- Interactive worksheets.
- Printable morning work.
- Paperless morning work.
- Go printable or paperless.
- Stay on track. Summer review.
- Easy elementary school curriculum.
- Remote learning packets or homework.
- Most need no answer key or key is included.
- Videos for audio and visual learners. God bless headphones!
See free teacher and homeschool digital interactive school-at-home learning exercises with no login, no tracking, no sign-up, no voucher, no account, and no credit card. Loads of digital activities for device-based learning.
Homeschool History Timeline
Many school and homeschool curricula teach history in mixed order. It starts in third grade and continues through high school: US History, World History, US History, World History, US History, World History. Do you see the pattern?
You get the idea. It can be hard to keep events in order time-wise.
Timelines are the answer for keeping history in chronological order - even if it is studied in scrambled order.
Once your kids begin to use a timeline template, history begins to make sense. They can make associations.
No matter in which order your curriculum teaches history, your students can understand and remember historical events better if they place events that they study in their proper place on their own timelines. It helps so much if they do the work themselves.
Even if your kids have a good sense of history, they can still benefit by adding names and dates to their timelines.
A Timeline Template Puts History In Order By Date
Items of interest from historical books and literature fit nicely in a historical timeline, too.
You can begin with a world timeline and add major dates as the school year progresses.
 Store the timeline in a binder or spread it out to study.
I have learned to have my students print the timeline template on card stock so that the timeline can endure through the years. Even children as young as third grade enjoy placing dates on a timeline and with care they can do this well. Teach them to write neatly and small.
By the time children reach seventh and eighth grade they really appreciate the importance of keeping a timeline. It's a great study guide.
Very soon they see how useful it would be to be able to keep it through their high school years, so this is very helpful when teaching homeschool history as we're more able to keep the same supplies through the years.
I know other teachers and parents besides myself who received near perfect History scores in high school and college; but didn't have a sense of history until they began teaching history with a timeline.
The idea of using a timeline was mentioned or required often during our school years, but we didn't think of keeping the same chart throughout our years in school. Many of my teachers skipped it.
Oh, how I wish I'd have thought to save my timelines in those days! I love history. This would have been perfect.
A timeline template is an awesome teacher aid, too. 'Just keep it on your desk or handy in your planner.
I still add to mine, especially when we've studied a new historical figure or read a new book.
Using A Bible Timeline, US History Timeline, Or World History Timeline?
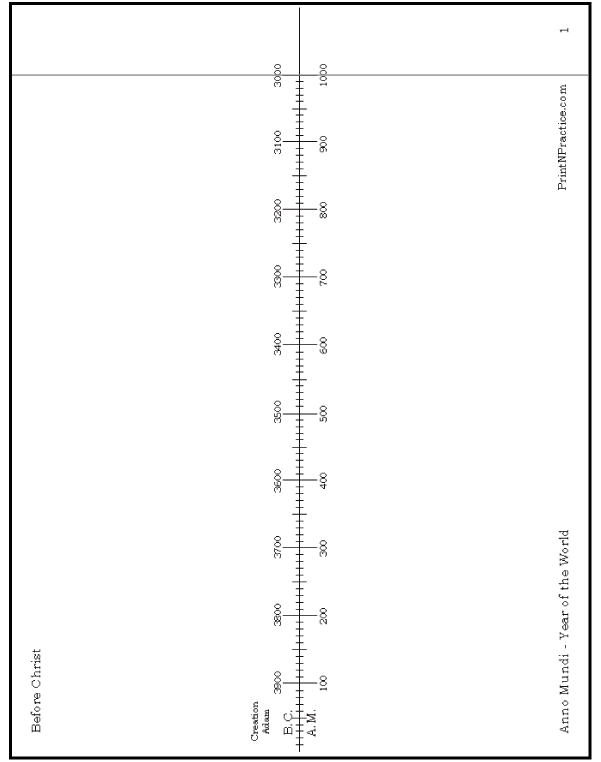
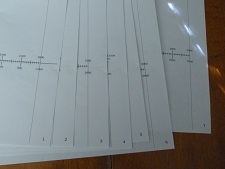
This seven page world history timeline template begins with the dates that I found in the back of our family Bible. Then I used this Bible timeline to find major dates to place in the BC world timeline.
Our family marvels at how tiny the American history timeline is compared to the rest of history.
The seven pages can be used as a:
- Bible timeline template - Use the first several pages.
- World history timeline template - Print the whole download.
- American history timeline template - Use Page 6.
Timeline Study Ideas
1. Start young. I've had third grade children able to handle keeping a timeline well and, on the other hand, I've had sixth grade students not be able to keep track of the difference between Anno Mundi (Year of the World - From Creation) and Before Christ (BC - dates go backward in a negative direction) without the timeline.
Age is not the important issue as to when to start.
I do know this: The older your students, the easier timelines are; but it is also very helpful to younger students. I'd recommend starting at any time. I sure hope my grandchildren start early.
A few dates at a time are not much effort for children to place once their timelines are made or in this case printed. You may have to help them place the names and dates.
2. Print on card stock. This makes the timelines last longer and it also makes them easier to find in a stack of mislaid papers.
I know from experience that the card stock is easier to find in a pile. You can feel it or you can see it from a distance because it is not rumpled or because it's holding up other pages.
Did we lose one? Did we have to make new ones or reprint?
Yes. Um. Several times.
3. Print single sided as this can make using the seven pages less confusing and able to be laid out in a single line almost six feet long.
The page numbers in the bottom right corner are very helpful for making sure to have the pages in order, especially in a classroom setting. This is also a huge help for keeping BC and AD dates in order.
4. Punch three holes. Whether or not you intend to keep your timelines in binders, I'd keep the option open and punch the holes early. This way if you want holes later, you won't risk removing completed information.
I keep mine in the folder of my binder because I refer to it frequently. With many additions through the years, I'm glad the holes are already punched.
I have seen children use either a binder or a folder. My experience with children shows that it is best that they keep their timelines in their binder. That way it's easy to flip to the right page, too.
We usually do not go beyond one thousand years very fast, so the other pages are kept better in a binder even if the one page is loose.
5. Keep through the years. Nothing helps one's sense of history like a timeline. Keeping the same timeline all the way through the school years is so helpful for remembering the names and dates in history.
It sure would have helped me in high school and college history if I'd had my high school notes on a timeline. Do yourself and your children a big favor. Help them make and keep a nice timeline.
Timeline Templates Tools
 Printable World Timeline To Print
Use pencil. I am so glad to have mechanical pencils, especially the finer lead of a .5 Pentel, Pilot, or Zebra. We all make mistakes, especially little children; so I like to have plenty on hand. They save sharpening time and mess and write so neatly. Be sure to get extra lead, too.
Rather than be discouraged by an ugly pen mark, pencil marks can be erased. Even through the ten or more years that we've been doing this, the pencil marks remain legible, so using pencil has been very helpful.
If you need to preserve a child's work for longer than high school, consider photo copying it as for their college history courses.
Use manuscript print. Manuscript handwriting is easier to keep neat on a timeline like it is for creating maps.
As with map making, printing the words can make them easier to read - especially over time.
You can also emphasize a title by using ALL CAPS, which is hard to do with cursive writing.
Use a ruler. Help your children to use a ruler, especially a small ruler for drawing straight lines. Show them how to align the ruler with other lines or the edge of the paper to make square lines at 90 degrees to the date line. Keep that ruler clipped into the binder rings if it has holes for it.
Or, use a 3x5 card - hole punched. Use a 3x5 card to draw straight lines when you do not all have rulers. It takes up very little space and fits in a folder pocket. If you punch a hole in it, the binder rings can hold it. It can tear through though, so then you can tuck it into the folder. :-)
Use a binder. A folder can keep the timeline nice and neat, yet if you're already using binder for several subjects they can be stored two ways.
Double Check Name And Date Placements
Tour the class. If you're teaching several children, take a tour around the classroom to check to see that dates are being placed relatively well.
On the first day I found it easier to begin with just a few dates such as Creation (page 1), Jesus' Birth, and even the child's own birthday (page 7) especially with kids in third and fourth grade.
Depending on your students, these few dates can be enough for a first sitting and is useful in gaining a "sense of history". It anchors the spanse of time involved in studying history, from "the beginning" till "now".
After the first day, simply add dates as you find them in history lessons or while reading books.
Tell them that this is it. It's encouraging to kids to find that "that's all there is", that recorded history really all fits on this chart if you write neatly and well.
Make Your History Timelines Fun!
 Seven Page World History Timeline
Use Different Colors And Fonts
If you add names and dates with the typewriter function on the timeline template PDF, your children can choose their favorite colors and fonts.
Remember to embold or use ALL CAPS in different places for more important people and events.
Help Each Other
I remember the days when I taught several different ages of our own children to place dates on their timelines. It was a lot of work for the youngest to make those pages. Not much fun.
Printing the timeline with the basic names and dates already placed was much easier.
It made it more fun when we all sat at the dining room table with the older children between the younger children. This way the older children and I could help the younger children place the main dates.
Our older children had drawn their own with ruler and pens, but by the time our youngest children were ready (older, younger, and last but not least - youngest) we had printed this printable timeline template. It was a huge relief to all of us!
The first dates are the trickiest to place, so keep a close eye on where the children are writing. You can also keep an eraser handy. :-)
Use your own style, but it might help to know that I've been glad to use the common
- lower case b. (with a period) for the term "born" and
- lower case d. for "died" near the date.
Although, if you're going to use your timeline through the years, you might want to stick with the birth or death, not both. Some books don't say which or only offer the one date and that's why we often end with both on our timelines.
Decades And Centuries, Good Guys And Bad Guys
These timeline pages have the tick marks for one thousand years per ten inches on a page.
- Each page marks one thousand years.
- Each inch marks a century and
- Each tick marks a decade.
If the date is marked with the event, birth, or death; it helps the children mark accurate placement of the names.
We have fun putting the "good guys" in the top space and "bad guys" in the bottom space under the line. The more we liked them, or the more obviously great the event or person was, the higher we placed them on our chart. The worse they were, the lower we placed their names.
Teach Geography With Your History Timeline Template
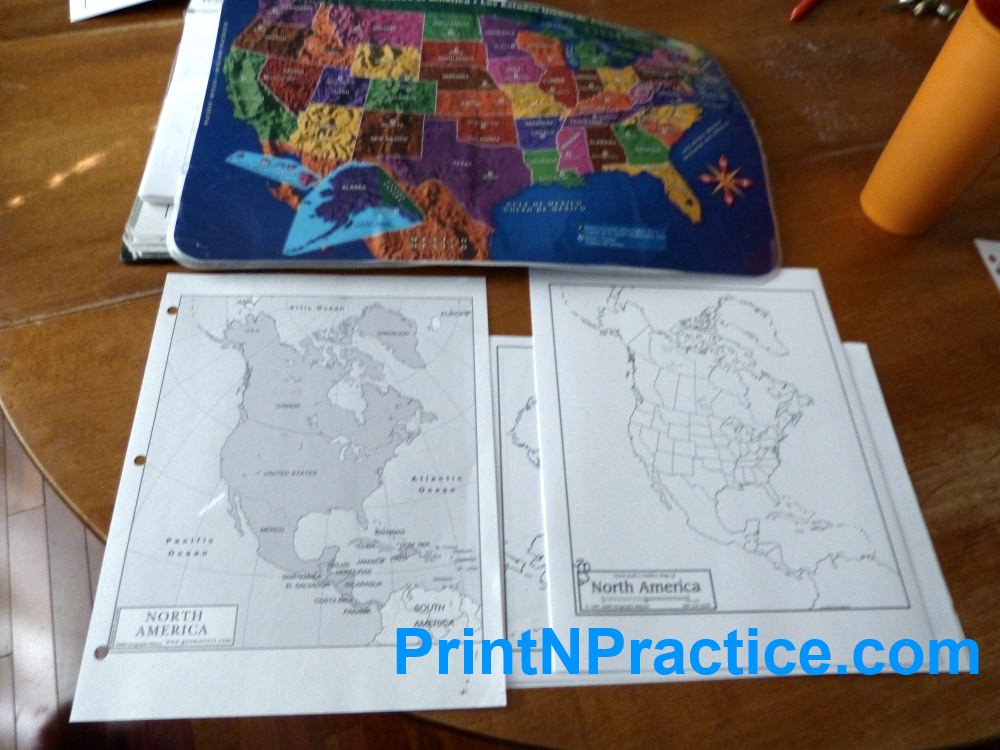 Use maps of the United States with our history timeline to anchor names, dates, and places together.
The Ultimate Geography And Timeline Guide

Since history and geography go hand in hand, it's an awesome idea to keep printable world maps in the same binder or folder as your timeline for easy reference.
We use The Ultimate Geography and Timeline Guide as it covers vocabulary and the use of geographical maps with history. It also has black line masters that you can copy.
Use Uncle Josh's Maps With Your Timeline Template
I printed the maps from Uncle Josh's Outline Map Book (or CD-Rom) on card stock and hole punch them to keep them in my binder. I keep the current one I'm using loose-leaf so I can refer to it easily. Or copy it if someone lost theirs.
Oh, and so often, history books do not have maps in easy places. I keep an extra copy in the back of our history book so we can mark it and refer to it as we study.


Printable History Timeline Template Review
In conclusion I'd like to say that teaching history used to scare me. Not now! It's super interesting and like filling in a puzzle. We find ourselves adding dates even when we're not "studying".
At the dinner table: Hm.... "When was that?" "Where did it happen?" "Who did it?"
Just like we turn to our globe when talking about world issues, we also turn to our timeline when we're piecing together how events turned or remembering what came first and what happened last.
- Be patient. The more students you have and the younger they are, the more help they'll need; but there are fewer dates necessary in the early grades. This really is a great head start for their future studies in history and geography.
- Be encouraged. The older your students are, the more they'll appreciate the effort. Young or old your students will all appreciate this "break from schoolwork" and they'll learn as they go. I save it for last in class. :-)
- Bring history to life and order with this free printable timeline template. Enjoy!
Thank you for visiting and for sharing!
~Mary
 Printable World History Timeline

Mary Fifer, BSBA is webmaster, author, and researcher at PrintNPractice.com. She has created elementary school practice exercises using printable or digital interactive worksheets. Perfect for today's teachers, tutors, homeschoolers, and students!
Thank you for visiting and for sharing. :-)
Be encouraged to stay in touch! Join my free newsletter....


%0A%20%23PrintNPractice%20%23HistoryTimeline%20%23HomeschoolWorksheets%20%23PrintableTimeline%20%23TimelineTemplate%20%23HighschoolHistory%20%23CollegeHistory%20%23USHistorytimeline%20%23americanhistorytimeline%20%23history%20%23BibleHistory)